Creating Academic Websites with R
Resul Umit
April 2021
Who am I?
Resul Umit
post-doctoral researcher at the University of Oslo
teaching and studying representation, elections, and parliaments
- a recent publication: Parliamentary communication allowances do not increase electoral turnout or incumbents’ vote share
Who am I?
Resul Umit
post-doctoral researcher at the University of Oslo
teaching and studying representation, elections, and parliaments
- a recent publication: Parliamentary communication allowances do not increase electoral turnout or incumbents’ vote share
teaching workshops, also on
Who am I?
Resul Umit
post-doctoral researcher at the University of Oslo
teaching and studying representation, elections, and parliaments
- a recent publication: Parliamentary communication allowances do not increase electoral turnout or incumbents’ vote share
teaching workshops, also on
- more information available at resulumit.com
My First Website
Using WordPress
opened just before starting my PhD in 2013, at wordpress.com
at first, with rare updates
- none based on data
- required getting used to at every login
- a system that I used only for my website
then, with more frequent blogposts
- frustrations with posts based on data
- slow to write and edit
- slow to write and edit
- still required getting used to at every login
- frustrations with posts based on data
My Current Website
Using R
migrated from WordPress in 2018
frustrations with blogposts based on dataslow to write and editblogdown(Xie et al., 2021a) makes quantitative academic writing efficient
required getting used to at every logina system used only for website updates- a system that I use everyday for other tasks
- cleaning and analysing data, writing results for publication
The Workshop — Overview
One full day, on how to create websites for academics with R
- building a minimal working site
- version-controlling and deploying it
- adding new content to the site
The Workshop — Overview
One full day, on how to create websites for academics with R
- building a minimal working site
- version-controlling and deploying it
- adding new content to the site
Based on personalising the example website of the
Academictheme, with two options- using real material, creating your website now
- using mock material, re-creating the demonstration website of the workshop
* - as a practice for creating your website afterwards
The Workshop — Overview
One full day, on how to create websites for academics with R
- building a minimal working site
- version-controlling and deploying it
- adding new content to the site
Based on personalising the example website of the
Academictheme, with two options- using real material, creating your website now
- using mock material, re-creating the demonstration website of the workshop
- as a practice for creating your website afterwards
Designed for researchers with basic knowledge of R programming language
- ability to work with R and RStudio will be very helpful
- but not absolutely necessary — these skills can be developed after the workshop as well
- ability to work with R and RStudio will be very helpful
The Workshop — Motivations
Academic outreach
- make your work easily accessible to other academics
- keep all academic work at one address
- offer versions without paywall
- e.g., pre-prints
The Workshop — Motivations
Academic outreach
- make your work easily accessible to other academics
- keep all academic work at one address
- offer versions without paywall
- e.g., pre-prints
Public outreach
- make your work easily accessible to non-academics, in two senses
- by removing paywalls
- e.g., pre-prints
- e.g., pre-prints
- by writing for non-academic audience in mind
- e.g., blogposts
The Workshop — Motivations — Impression Management
What do people see when they google your name?
- google your name now, and scroll through
- is this exactly what you want people to see?
- google your name now, and scroll through
The Workshop — Motivations — Impression Management
What do people see when they google your name?
- google your name now, and scroll through
- is this exactly what you want people to see?
- google your name now, and scroll through
- Websites are an impression management tool
- manage your online presence yourself
- otherwise, others --- e.g., your (past and present) university --- will
- otherwise, others --- e.g., your (past and present) university --- will
- provide a concrete example of your skills
- e.g., working with R, Git
- manage your online presence yourself
The Workshop — Aims
To leave you with a website
- working, continuously deployed from RStudio
- albeit minimal and/or mock
The Workshop — Aims
To leave you with a website
- working, continuously deployed from RStudio
- albeit minimal and/or mock
To make you aware what else is possible
- so that you can update your website after the workshop
- awareness of what is possible,
Google, and perseverance are all you need
The Workshop — Limitations
This workshop does not cover
dynamic websites
- it covers static websites, as generated by
Hugo, as integrated into R byblogdown- all visitors see the same website, as last generated
- this setting offers what most academics would need
- it covers static websites, as generated by
structural (HMTL, CSS, or JavaScript) customisation
- e.g., changing the entire appearance and functionality of a theme, writing a new one
- switching to another
Hugotheme is an option- see 300+ options at https://themes.gohugo.io/
multi-language or multi-author websites
- these are possible, and well documented elsewhere
- e.g, for multi-lingual websites, see https://sourcethemes.com/academic/docs/language/
- e.g., for multi-author websites, see my workshop on collaboration
- these are possible, and well documented elsewhere
The Workshop — Organisation
Sit in groups of two- participants learn as much from their partner as from instructors
- play the role of co-authors
The Workshop — Organisation
Sit in groups of two- participants learn as much from their partner as from instructors
- play the role of co-authors
Type, rather than copy and paste, the code that you will find on these slides
- typing is a part of the learning process
- but do copy the text from JJD's website, if you are re-creating it
When you have a question
ask your partnergoogle together- turn your microphone on and ask, or
- type it in the chat
The Workshop — Organisation — Slides*
- Slides with this background colour indicate that your action is required, for
- setting the workshop up
- e.g., installing software
- e.g., installing software
- personalising the website
- e.g., putting in your own contact details
- e.g., putting in your own contact details
- completing the exercises
- e.g., adding content to your website
- e.g., adding content to your website
- setting the workshop up
- Some of these slides have countdown timers
- for guidance only
* These slides are, and will remain, available at https://resulumit.com/teaching/rbd_workshop.html.
01:00
The Workshop — Organisation — Slides
- Codes and texts that go in as input appear as such — in a different font, on gray background
- long codes and texts will have their own line(s)
ggplot(data = df, mapping = aes(x = wt, y = mpg, color = cyl)) + geom_point(size = 2) + scale_colour_gradient(name = "Cylinders", high = "#132B43", low = "#56B1F7", breaks = c(4, 6, 8)) + theme_bw() + theme(axis.title = element_text(size = 20), axis.text = element_text(size = 20), legend.title = element_text(size = 20), legend.text = element_text(size = 20)) + labs(x = "\nWeight", y = "Miles/Gallon\n")The Workshop — Organisation — Slides
- Codes and texts that go in as input appear as such — in a different font, on gray background
- long codes and texts will have their own line(s)
- Results that come out as output appear as such — in the same font, on green background
- except very obvious results, such as figures and tables
The Workshop — Organisation — Slides
- Codes and texts that go in as input appear as such — in a different font, on gray background
- long codes and texts will have their own line(s)
- Results that come out as output appear as such — in the same font, on green background
- except very obvious results, such as figures and tables
- Specific sections are highlighted yellow as such for emphasis
- these could be for anything — codes and texts in input, results in output, and/or texts on slides
- Names for items such as files, folders, variables are in
typefont.- typefont with a trailing slash indicates a directory, known also as folder
- e.g.,
content/is a directory
- e.g.,
- typefont with a trailing slash indicates a directory, known also as folder
The Workshop — Contents
Part 1. Getting the Tools Ready
- e.g., installing software
- e.g., the look in a browser
- e.g., the look in RStudio
- e.g., overall organisation and settings
The Workshop — Contents
Part 1. Getting the Tools Ready
- e.g., installing software
- e.g., the look in a browser
- e.g., the look in RStudio
- e.g., overall organisation and settings
- e.g., organisation of pages and sections
- e.g., publishing your website online
- e.g., adding text and images
- e.g., adding tables and figures
Part 1. Getting the Tools Ready
Git — Download from the Internet and Install
Git is a software that
- keeps track of versions of a set of files
- is local to you, the records are kept on your computer
- is free
Git — Download from the Internet and Install
Git is a software that
- keeps track of versions of a set of files
- is local to you, the records are kept on your computer
- is free
To get this software
- on Windows, install 'Git for Windows', downloading from https://gitforwindows.org
- select 'Git from the command line and also from 3rd-party software'
- select 'Git from the command line and also from 3rd-party software'
- on Mac, install 'Git', downloading from https://git-scm.com/downloads
- on Windows, install 'Git for Windows', downloading from https://gitforwindows.org
GitHub — Open an Account
GitHub is a hosting service, or a website, that
- keeps a copy of the versions created by Git
- is remote to you, like the Dropbox website
- is, mostly, free
GitHub — Open an Account
GitHub is a hosting service, or a website, that
- keeps a copy of the versions created by Git
- is remote to you, like the Dropbox website
- is, mostly, free
To sign up for this service
- register an account at https://github.com
- registering an account is free
- usernames are public, editable
- either choose an anonymous username for now
- or choose one carefully — it becomes a part of users' online presence
- register an account at https://github.com
Netlify — Open an Account
Netlify is a hosting service that
- builds your website out of individual files, using
Hugo - hosts your website on its servers, making it available online
- is, mostly, free
- builds your website out of individual files, using
Netlify — Open an Account
Netlify is a hosting service that
- builds your website out of individual files, using
Hugo - hosts your website on its servers, making it available online
- is, mostly, free
- builds your website out of individual files, using
To sign up for this service
- register an account at https://www.netlify.com
- registering an account is free
- you can use your GitHub account to register
- register an account at https://www.netlify.com
R and RStudio — Download from the Internet and Install
R is a programming language that
- does or facilitates many things, e.g., creating a website
- provides the engine for RStudio — an IDE, or dashboard
- is free
R and RStudio — Download from the Internet and Install
R is a programming language that
- does or facilitates many things, e.g., creating a website
- provides the engine for RStudio — an IDE, or dashboard
- is free
- Download R from https://cloud.r-project.org
- choose the version for your operating system
- Download RStudio from https://rstudio.com/products/rstudio/download
- choose the free version
R Packages — Install from within RStudio
Install the following R packages, using the code below
install.packages(c("blogdown", "dplyr", "ggplot2"))blogdown(Xie et al., 2021a), for creating websites- comes with, among others, the
knitrpackage (Xie, 2021), which we will use for tabling data
- comes with, among others, the
dplyr(Wickham et al., 2021), for data manipulation- alternatives: e.g.,
base,data.table(Dowle & Srinivasan, 2021)
- alternatives: e.g.,
ggplot2(Wickham et al., 2020b), for plotting data- alternatives: e.g.,
base,plotly(Sievert et al., 2021)
- alternatives: e.g.,
blogdown — Overview
- A relatively small R package, to facilitate creating websites
- enables a seamless workflow, all within RStudio
- does not build websites itself
blogdown — Overview
- A relatively small R package, to facilitate creating websites
- enables a seamless workflow, all within RStudio
- does not build websites itself
- Builds upon other software
- most importantly
Hugofor generating sites - (R) Markdown for text formatting
pandocfor transforming Markdown files into HTMLYAMLsyntaxes for configuration and front matter
- most importantly
- Has a confusing name
- it is not necessarily about blogs, but general-purpose websites
- Comes with a book
- blogdown: Creating Websites with R Markdown (Xie et al., 2021b)
- open access at https://bookdown.org/yihui/blogdown/
- also has a confusing name, as R Markdown is not central to creating websites
- blogdown: Creating Websites with R Markdown (Xie et al., 2021b)
blogdown — Addins
Observe that, after installing
blogdown, RStudio includes six new addins- e.g.,
ServeSite - mouse over in RStudio to read their definitions
- e.g.,
Each addin has a corresponding function
- e.g.,
blogdown::serve_site()*
- e.g.,
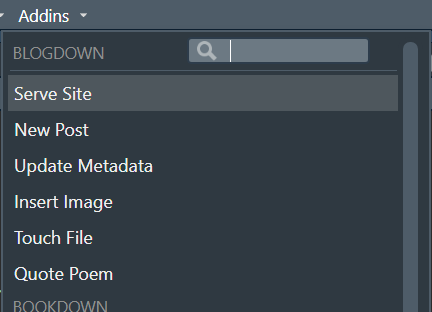
[*] Not all blogdown functions are exported. In practice, this means we would need to call blogdown::: (with the triple-colon operator) for some functions, such blogdown:::touch_file().
blogdown — Important Fuctions
blogdownprovides functions to facilitate interacting withHugofrom within R, includingblogdown::install_hugo()blogdown::serve_site()
- It is customary to call
blogdownfunctions with the double colon operator ::- the usual way would also work
- i.e., load
library(blogdown)first
- i.e., load
- the usual way would also work
- To see the list of exported functions, type
blogdown::in theConsole- hit the
tabkey on your keyboard
- hit the
Hugo — Install from within RStudio
Install Hugo, with the following code
blogdown::install_hugo()Hugois a static website generator- static websites are a collection of pages
- pages display the same information to all visitors
It comes with
- a detailed documentation, available at https://gohugo.io/documentation/
- 300+ themes, available at https://themes.gohugo.io/
- we will be working with the
Academictheme
- we will be working with the
Other Resources — For Later
R Markdown: The Definitive Guide (Xie et al., 2019)
- open access at https://bookdown.org/yihui/rmarkdown
R Markdown Cheat Sheet
- follow from the RStudio menu
Help -> Cheatsheets -> R Markdown Cheat Sheet
Pandoc User's Guide
- available at https://pandoc.org/MANUAL.html
R for Data Science (Wickham and Grolemund, 2019)
- open access at https://r4ds.had.co.nz
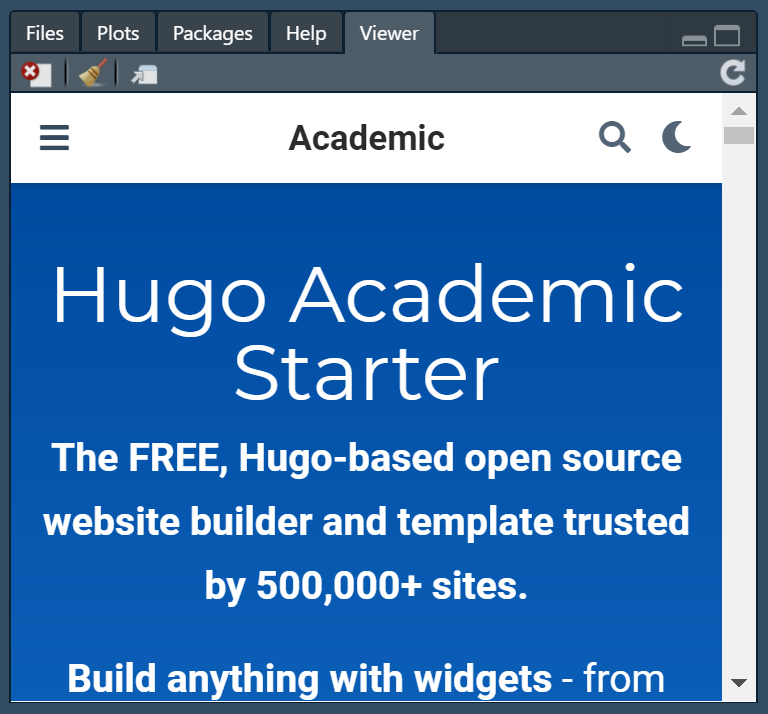
Academic — Overview
A theme designed by George Cushen
demonstration website is live at https://themes.gohugo.io/theme/academic/
documentaion is available at https://wowchemy.com/docs/

Demonstration Sites
Visit three demonstration websites
- website of the theme that we will be using, at https://themes.gohugo.io/theme/academic
- website of this workshop that you may wish to re-create, at https://janejdoe.netlify.app
- website of any other theme, listed at at https://themes.gohugo.io
Pay attention to the similarities and differences
- between the websites and/or themes
- between the behaviour of the menu items
05:00
Academic — Demonstration Site
- The homepage is composed of different parts, called widgets
- e.g., the sections titled
Biography,Experience,Accomplishmentsetc.
- e.g., the sections titled
Academic — Demonstration Site
- The homepage is composed of different parts, called widgets
- e.g., the sections titled
Biography,Experience,Accomplishmentsetc.
- e.g., the sections titled
- Some menu items direct the screen to different widgets on the homepage
- e.g.,
Demo,Posts,Projectsetc.
- e.g.,
- Other menu items direct to stand alone sections
- e.g.,
Courses
- e.g.,
- The menu also has a search function and a day/night mode switch
Academic — Advantages
- Designed especially for academics in mind
- features what academics would want to feature
- e.g., education, publications
- features what academics would want to feature
Academic — Advantages
- Designed especially for academics in mind
- features what academics would want to feature
- e.g., education, publications
- features what academics would want to feature
- Well looked after
- gets updated very frequently
Hugoreleased v0.71.1 on Monday 25 May 2020, which broke the themeAcademicgot updated the next day with a fix
- has a lively community of users and developers behind it
- gets updated very frequently
- Well documented
- every line of code in the example site is commented in the backend
- more documentation available at https://sourcethemes.com/academic/docs/
Academic — Disadvantages
Complicated
- with its high customisation, comes high complexity
- its widgets can at first be overwhelming
Academic — Disadvantages
Complicated
- with its high customisation, comes high complexity
- its widgets can at first be overwhelming
Popular
- over 100,000 websites use this theme
- hard to stand out in this crowd
Academic — Disadvantages
- Complicated but well documented
- with its high customisation, comes high complexity
- its widgets can at first be overwhelming
- you can handle it on your own
- Popular but with room for personalisation
- over 100,000 websites use this theme
- hard to stand out in this crowd
- it comes with different colour schemes, fonts
- there are many potential combinations of widgets
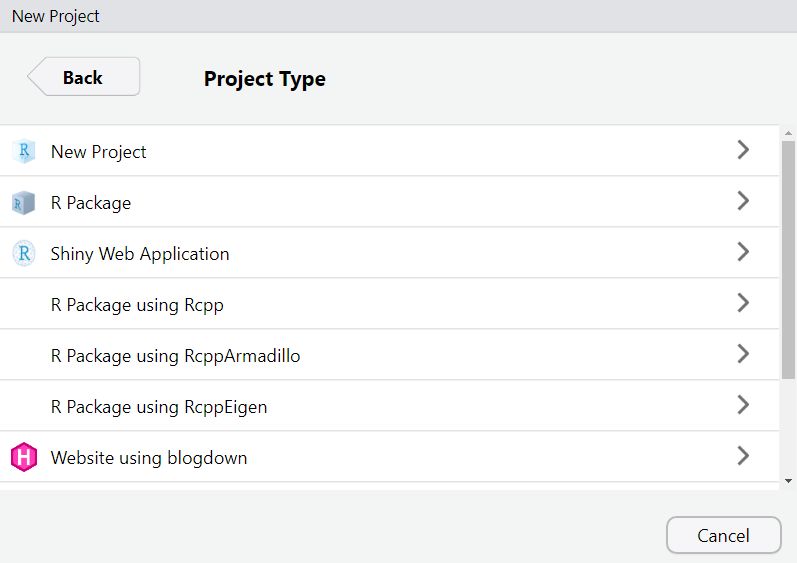
Website Backend — Create from within RStudio
- Create a new R project, specifically for a website
File -> New Project -> New Directory -> Website using blogdown
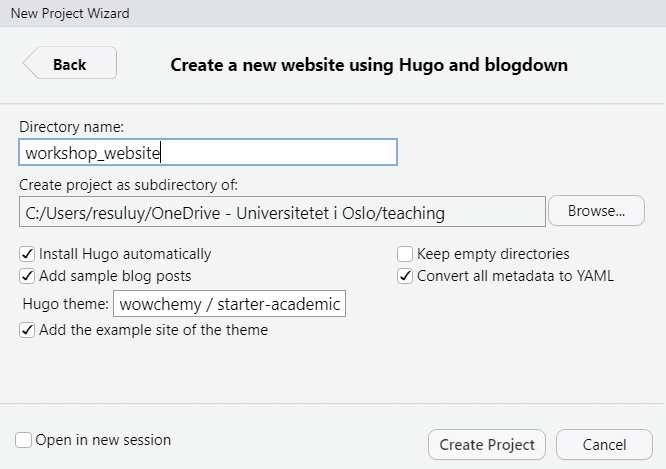
Give your project a name with
Directory NameChoose a location for the project with
Browse...- synced locations, e.g.,
Dropbox, are likely to cause warning/error messages- pause syncing, or add an sync exclusion on
Dropbox
- pause syncing, or add an sync exclusion on
- synced locations, e.g.,
Website Backend — Create from within RStudio
- Observe that the default theme is
yihui/hugo-lithium- this has the format
GiTHubUserName/RepoName - located at https://github.com/yihui/hugo-lithium
- this has the format
- Change the theme to
wowchemy/starter-academic- this is the
Academictheme - located at https://github.com/wowchemy/starter-academic
- this is the
- Click
Create Projectto start
Website Backend — Directory Structure
Observe that the root directory* is now populated with files for the theme and the example website
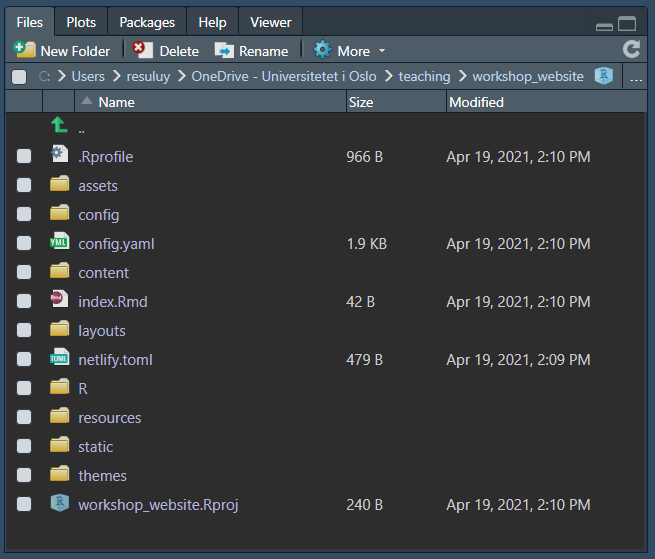
[*] The root directory is the main directory of your website project. It is often referred with a single slash /. For example /config.yaml indicates that there is a file called config.yaml directly under the root directory — e.i., it is not in any other sub-directory.
Website Backend — Directory Structure
Observe that the root directory is now populated with files, including
/config.yamland other configuration files under/config/- sets global configurations
- e.g., title, decription, navigation menu
- uses the YAML syntax
- documented at https://yaml.org/spec/1.2/spec.html
- will be covered here later on
- sets global configurations
Website Backend — Directory Structure
Observe that the root directory is now populated with files, including
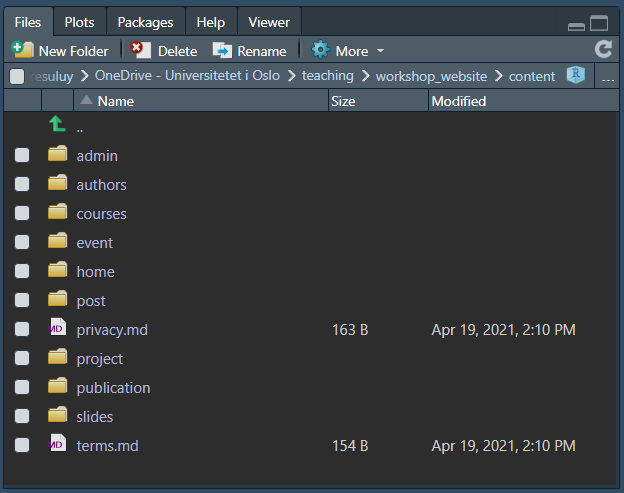
/config.yaml,/config//content/- includes files to be transformed into HTML pages
- each directory under
/content/is a section of a website- e.g.,
/content/post/can be viewed athttps://janejdoe.netlify.app/post/
- e.g.,
Website Backend — Directory Structure — /content/
Observe that the files under
/content/are typically Markdown files- with the
.mdextension
- with the
Website Backend — Directory Structure — /content/
Observe that the files under
/content/are typically Markdown files- with the
.mdextension
- with the
These files have typically two sections
- a front matter with the YAML syntax
- YAML goes between a pair of three hyphens ---
- YAML goes between a pair of three hyphens ---
- and some text
- using Markdown syntax
- a front matter with the YAML syntax
Website Backend — Directory Structure
Observe that the root directory is now populated with files, including
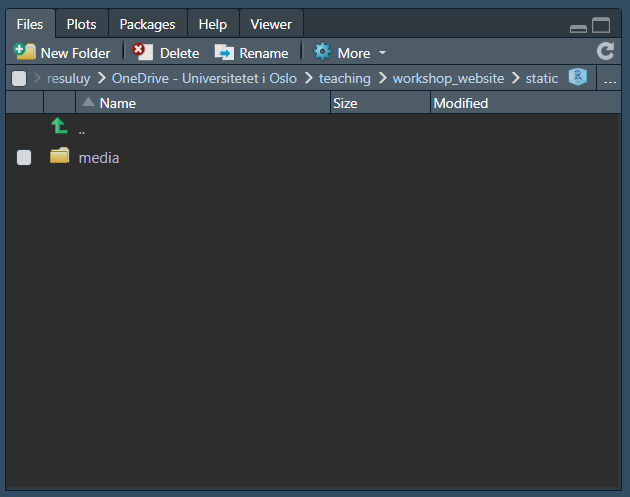
/config.yaml,/config//content//static/- contains files that should appear on websites as is
- e.g., images, PDF files
- these can be organised within separate directories
- e.g., images can be put in
static/media/
- e.g., images can be put in
Hugodoes not transform the files in this folder while generating websites
- contains files that should appear on websites as is
Website Backend — Directory Structure — Notes
Hugowebsites follow more or less the same directory structure- see the
Hugodocumentation for directory structure at https://gohugo.io/getting-started/directory-structure/ - structure might look slightly different in different themes
- e.g., less complex themes have one configuration file only, without
/config/
- e.g., less complex themes have one configuration file only, without
- see the
The structure, as well as other technical details, might change
- changes come with a new
Hugoversion - a change may or may not break a theme
- themes are designed, and websites are generated, with a certain version
- these two versions do not have to be the same, but compatible
- changes come with a new
Website Backend — Set Hugo Version
Set blogdown.hugo.version in /.Rprofile to the latest Hugo version that you have
Hugoversion in/.Rprofileis often out of date- first check the installed
Hugoversions that you have- by running
blogdown::find_hugo("all")in theConsole
- by running
- changes to
.Rprofiletake affect only after saving the file, and restarting R- after saving, follow
Session -> Restart R
- after saving, follow
Website Backend — Serve Site
Click the
Addins->ServeSiteto preview the site- this is equivalent to typing
blogdown::serve_site()in theConsole
- this is equivalent to typing
Observe that the website is live in the
Viewertab- this can be viewed with a browser, by clicking on the window icon
Website Backend — Serve Site
Click the
Addins->ServeSiteto preview the site- this is equivalent to typing
blogdown::serve_site()in theConsole
- this is equivalent to typing
Observe that the website is live in the
Viewertab- this can be viewed with a browser, by clicking on the window icon

Website Project — Serve Site
Click the
Addins -> Serve Siteto preview the site- this is equivalent to typing
blogdown::serve_site()in theConsole
- this is equivalent to typing
Observe that the website is live in the
Viewertab- this can be viewed with a browser, by clicking on the window icon
You can make live edits in this state
- e.g., in
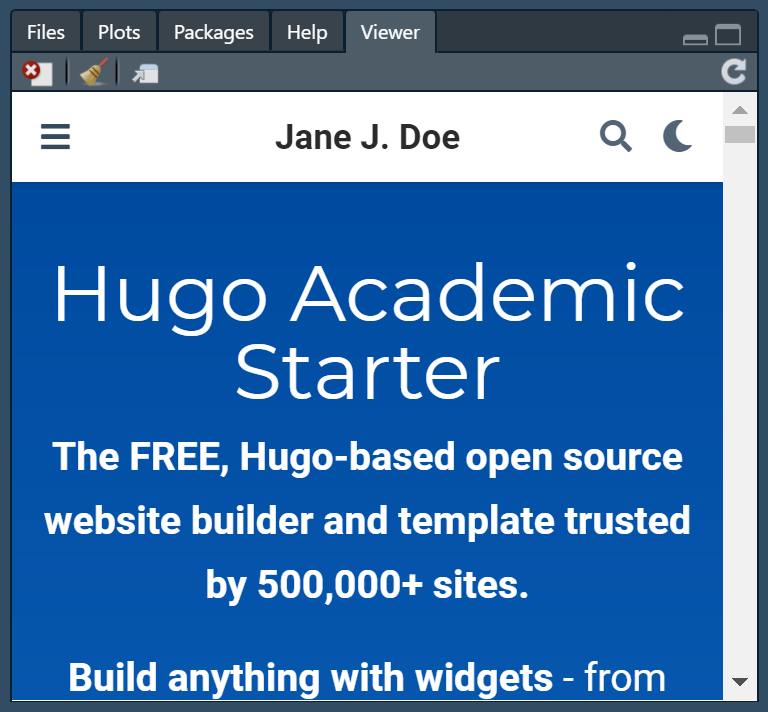
/config.yaml, change title = "Academic", and save- e.g., to title = "YourName"
- observe the live change in the website
- e.g., in
Configuration — Overview
There are four configuration files in the theme
/config.yaml/config/_default/languages.yaml/config/_default/menus.yaml/config/_default/params.yaml
Configuration — Overview
There are four configuration files in the theme
/config.yaml/config/_default/languages.yaml/config/_default/menus.yaml/config/_default/params.yaml
These files are for overall definitions, settings, and organisation
- e.g., creating menu items; defining font, language
- these files are written with the YAML syntax
We will work with the existing options of in these files
- for the complete list of options that you can use in configuration files, see https://gohugo.io/getting-started/configuration
Configuration — YAML Syntax
YAML uses key: value pairs
- keys are pre-defined — mostly by
Hugo, but also by each theme- e.g.,
title
- e.g.,
- users supply the values
- e.g., "Name Surname"
- keys are pre-defined — mostly by
title: "Jane J. Doe"Configuration — YAML Syntax
YAML uses key: value pairs
- keys are pre-defined — mostly by
Hugo, but also by each theme- e.g.,
title
- e.g.,
- users supply the values
- e.g., "Name Surname"
- keys are pre-defined — mostly by
Values can take
- strings*
title: "Jane J. Doe"* String do not need quotation marks unless they include special characters, such as a colon. Once I spent half a day trying to understand why my website would not build, only to figure this nuance out. I therefore recommend using quotations marks for all strings, just in case.
Configuration — YAML Syntax
YAML uses key: value pairs
- keys are pre-defined — mostly by
Hugo, but also by each theme- e.g.,
title
- e.g.,
- users supply the values
- e.g., "Name Surname"
- keys are pre-defined — mostly by
Values can take
- strings, in quotation marks
- numbers, bare
title: "Jane J. Doe" summaryLength: 30Configuration — YAML Syntax
YAML uses key: value pairs
- keys are pre-defined — mostly by
Hugo, but also by each theme- e.g.,
title
- e.g.,
- users supply the values
- e.g., "Name Surname"
- keys are pre-defined — mostly by
Values can take
- strings, in quotation marks
- numbers, bare
- Boolean values, in lower case, bare
title: "Jane J. Doe" summaryLength: 30 enableEmoji: trueConfiguration — YAML Syntax
YAML uses key: value pairs
- keys are pre-defined — mostly by
Hugo, but also by each theme- e.g.,
title
- e.g.,
- users supply the values
- e.g., "Name Surname"
- keys are pre-defined — mostly by
Values can take
- strings, in quotation marks
- numbers, bare
- Boolean values, in lower case, bare
- sequence of values with a hyphen each
title: "Jane J. Doe" summaryLength: 30 enableEmoji: true interests: - Party politics - Public policy - International politiesConfiguration — YAML Syntax — Notes
There is an alternative way to write sequence of values
- in square brackets, separated by comma
title: "Jane J. Doe" summaryLength: 30 enableEmoji: true interests: [Party politics, Public policy, International polities]Configuration — YAML Syntax — Notes
Multiple nesting of keys and sequences is also possible
- requires indentation with four spaces for the first nesting, and an hyphen for the second
education: courses: - course: PhD in Political Science institution: University of Vienna year: 2017 - course: MSSc in European Studies institution: University of Tampere year: 2009Configuration — YAML Syntax — Notes
To disable an option in YAML, you can
- comment its line out with a hash
# title: "Jane J. Doe"Configuration — YAML Syntax — Notes
To disable an option in YAML, you can
- comment its line out with a hash
# title: "Jane J. Doe"- set it to
[]- this may not work in nests
title: []Configuration — YAML Syntax — Notes
To disable an option in YAML, you can
- comment its line out with a hash
# title: "Jane J. Doe"- set it to
[]- this may not work in nests
title: []- set it to ""
title: ""Configuration — YAML Syntax — Notes
To disable an option in YAML, you can
- comment its line out with a hash
# title: "Jane J. Doe"- set it to
[]- this may not work in nests
title: []- set it to ""
title: ""- delete it altogether
- not recommended, as you might need that key in the future
Exercises — Configuration — /config.yaml
- Edit one or more values in the
/config.yamlfile- locate the file under the root directory
- edit at least the
titleandcopyright* keys, with- your information, or
- information on JJD's website
- remember to save the file
- and observe the changes in the RStudio Viewer and/or on a browser
- Scroll through the other keys
- to see what else is available that you may wish to edit
- once your website is online, you should also edit
baseurlin this file- remember to keep the trailing slash
- e.g. https://janejdoe.netlify.app/
* © is the HTML code for the copyright symbol ©. {year} turns into the current year, so that you don't have to update this every year.
05:00
Exercises — Configuration — params.yaml
- Edit one or more values in the
params.yamlfile- locate it under
/config/_default/ - edit at least the values for contact details
- observe the changes in the RStudio Viewer and/or on a browser
- locate it under
Scroll through the other keys in other sections
- colour schemes and fonts are defined in this file as well
- an important opportunity to personalise
- see what is available at https://sourcethemes.com/academic/themes/
- icons are available from various packages
- see the list at https://sourcethemes.com/academic/docs/page-builder/#icons
- colour schemes and fonts are defined in this file as well
15:00
Configuration — menus.yaml
This file configures the website menu
- creates and orders menu items
- directs them
- to a specific section on the homepage
- e.g., to a widget such as Contact at the bottom of the homepage
- e.g., to a widget such as Contact at the bottom of the homepage
- to a specific page
- e.g., to a page that lists the titles of all blogposts
- e.g., to a specific blogpost
- to a specific section on the homepage
Configuration — menus.yaml
- Define menu items
- as a list, with the
nameargument
- as a list, with the
main - name: "Posts" - name: "Courses" - name: "Twitter" - name: "CV"Configuration — menus.yaml
- Define menu items
- Order the items
- with the
weightargument
- with the
- Note that
- the order, not the actual value, matters
- you could use 1, 4, 9 ... instead
- you could use 1, 4, 9 ... instead
- using the same value for two or more items should be avoided
- the order, not the actual value, matters
main - name: "Posts" weight: 10 - name: "Courses" weight: 30 - name: "Twitter" weight: 20 - name: "CV" weight: 40Configuration — menus.yaml
- Define menu items
- Order the items
- Link them to destinations
- with the
urlargument- with a number sign # to a widget on the homepage
- these match a file name under
/content/home/
- these match a file name under
- with a trailing slash / to sections
- these match a file or folder name under
/content/
- these match a file or folder name under
- with URLs to external sites
- e.g., Twitter
- e.g., Twitter
- with paths relative to the
/static/sub-directoryfiles/cv.pdfsuggests cv is under/static/files/cv.pdf
- with a number sign # to a widget on the homepage
- with the
main: - name = "Posts" weight = 10 url = "#posts" - name = "Courses" weight = 30 url = "courses/" - name = "Twitter" weight = 20 url = "https://twitter.com/resulumit" - name = "CV" weight = 40 url = "files/cv.pdf"Exercises — Configuration — menus.yaml
Edit the
menus.yamlfile, as much as possible now*- create, order, and direct menu items
- observe the changes in the RStudio Viewer and/or on a browser
* You are likely to edit this file throughout the workshop, as your website evolves.
05:00
Configuration — languages.yaml
This file
defines the language of the website
- the default is English
can make the site multi-lingual
- we will not cover it in this workshop
- instructions available at the above link as well
Configuration — Multi-lingual Sites
- Considerations
- who is your target audience?
- would they be lost if your website was only in one language?
- if not, perhaps it is not worth the hassle
- if not, perhaps it is not worth the hassle
- would they be lost if your website was only in one language?
- what will be in multiple languages?
- all website, or some widgets and/or pages?
- even in a single language setting, widgets and pages can be written in different languages
- all website, or some widgets and/or pages?
- who is your target audience?
Strategy
- build your website in full in one language first, than add the second
- rather then building it multiple languages in tandem
- hence not covered in the workshop
- build your website in full in one language first, than add the second
Exercises — Configuration — languages.yaml
This exercise is optional
- only if your preferred language is not English
- see the list of language options and their codes at https://wowchemy.com/docs/guide/language/
Change the langauge of your website, in two steps
- in
languages.yaml:- provide a different value to the
languageCodekey
- provide a different value to the
- in
/config.yaml:- edit the value for
defaultContentLanguage
- edit the value for
- in
03:00
Structure — Overview
Structure depends mostly on the way the
/content/directory is organised, including- individual pages, such as a homepage
- sections (collections of pages), such as a blog
Each page at the fronted corresponds to a Markdown file at the backend
- changing the content and/or the position of these files at the backend will change the frontend
Sections are organised in separate directories under
/content/- first-level sub-directories become a section by default
- e.g.
content/post/is a section (for all blogposts)
- e.g.
- creating a section under a section requires manual input
- by adding a file named
_index.mdunder the second-level directory
- by adding a file named
- first-level sub-directories become a section by default
Structure — Examples
A website with a single page
.└── /content/ | └── home.md # <- https://janejdoe.netlify.app/home/Structure — Examples
A website with two single pages
.└── /content/ | ├── home.md # <- https://janejdoe.netlify.app/home/ | └── about.md # <- https://janejdoe.netlify.app/about/Structure — Examples
A website with five pages
.└── /content/ | ├── home.md # <- https://janejdoe.netlify.app/home/ | ├── about.md # <- https://janejdoe.netlify.app/about/ | └── blog/ # <- https://janejdoe.netlify.app/blog/ | ├── first-post.md # <- https://janejdoe.netlify.app/blog/first-post/ | └── second-post.md # <- https://janejdoe.netlify.app/blog/second-post/Note that there are
- four single pages: home, about, first-post, second-post
- one section page: blog
- because it is a first order sub-directory
- by default, this section page is tiled Blog, showing the links to the two posts
Structure — Examples
A website with three pages
.└── /content/ | ├── home.md # <- https://janejdoe.netlify.app/home/ | ├── about.md # <- https://janejdoe.netlify.app/about/ | └── blog/index.md # <- https://janejdoe.netlify.app/blog/Note that
index.mdis a special file name forHugo— it creates a page matching its directory name- there are three single pages: home, about, blog
- blog is not a section page, but a simple page, showing a blogpost
Structure — Examples
A website with five pages: three three single pages and two nested section pages
.└── /content/ | ├── home.md # <- https://janejdoe.netlify.app/home/ | └── blog/ # <- https://janejdoe.netlify.app/blog/ | ├── first-post.md # <- https://janejdoe.netlify.app/blog/first-post/ | └── academic/ # <- https://janejdoe.netlify.app/blog/academic/ | ├── _index.md | └── second-post.md # <- https://janejdoe.netlify.app/blog/academic/second-post/Structure — Examples
A website with five pages: three single pages and two nested section pages
.└── /content/ | ├── home.md # <- https://janejdoe.netlify.app/home/ | └── blog/ # <- https://janejdoe.netlify.app/blog/ | ├── first-post.md # <- https://janejdoe.netlify.app/blog/first-post/ | └── academic/ # <- https://janejdoe.netlify.app/blog/academic/ | ├── _index.md | └── second-post.md # <- https://janejdoe.netlify.app/blog/academic/second-post/Structure — Examples
A website with five pages: three single pages, two nested section pages
.└── /content/ | ├── home.md # <- https://janejdoe.netlify.app/home/ | └── blog/ # <- https://janejdoe.netlify.app/blog/ | ├── first-post.md # <- https://janejdoe.netlify.app/blog/first-post/ | └── academic/ # <- https://janejdoe.netlify.app/blog/academic/ | ├── _index.md | └── second-post.md # <- https://janejdoe.netlify.app/blog/academic/second-post/Notice that
_index.md, with underscore, is a special file name forHugo— it creates sections
Structure — Examples
Having _index.md in first-order sub-directories is optional, but may be helpful
- can add metadata and/or text to section pages
- e.g., these are by default titled as the plural of section names
- e.g., the page
publication/is titled asPublications
- e.g., the page
- change this behaviour with
_index.md
- e.g., these are by default titled as the plural of section names
.└── /content/ | └── home.md # <- https://janejdoe.netlify.app/home/ | └── about.md # <- https://janejdoe.netlify.app/about/ | └── blog/ # <- https://janejdoe.netlify.app/blog/ | ├── _index.md | ├── first-post.md # <- https://janejdoe.netlify.app/blog/first-post/ | └── second-post.md # <- https://janejdoe.netlify.app/blog/second-post/Exercises — Structure
Explore the directory structure of your website in RStudio
- how many pages and sections are there?
- are there any subsections?
- hint: see
courses/
- hint: see
Do a matching exercise
- open the example site on a browser
- try and find the front end of the following file
/content/publication/journal-article/index.md
- compare the back end with front end
05:00
Structure — home/ — Overview
The homepage in
Academicdoes not exactly follow the structure above- every file under
home/is not a stand alone page - these files, called widgets, are rather stitched under one another
- considered as one of the strengths of the theme
- some academics prefer to have only this page
- every file under
Widgets are complicated Markdown files
- can be stitched under one another
- can get text from files elsewhere
- e.g., the
contact.mdwidget gets the address information fromparams.yaml
- e.g., the
A homepage can have one, more, or all widgets
- widgets can be deactivated or repeated
- they can be re-ordered as well
Structure — home/ — Widgets
There are 13 types of pre-defined widgets
- for detailed explanations, see https://sourcethemes.com/academic/docs/page-builder/
- you can build your own widget as well
Structure — home/ — Widgets
There are 13 types of pre-defined widgets
- for detailed explanations, see https://sourcethemes.com/academic/docs/page-builder/
- you can build your own widget as well
Widgets are in fact Markdown files, with .md extension
- each has YAML syntax as the front matter
- some has Markdown text as well
- e.g.,
demo.md
- e.g.,
- because they can have both variables and text, YAML goes between a pair of three hashes
Widgets are located under
/content/home/- except
index.md, each file is a widget — some duplicates of the same type
- except
Structure — Homapage — Widgets — Important Keys
Some keys are common across all widgets
- Indicate the type of the widget
- see all pre-defined types at https://sourcethemes.com/academic/docs/page-builder/
- Indicate the type of the widget
widget: "pages"Structure — Homapage — Widgets — Important Keys
Some keys are common across all widgets
- Indicate the type of the widget
- De-activate a widget
widget: "pages" active: falseStructure — Homapage — Widgets — Important Keys
Some keys are common across all widgets
- Indicate the type of the widget
- De-activate a widget
- Order a widget in relation to other widgets
widget: "pages" active: false weight: 9Structure — Homapage — Widgets — Important Keys
Some keys are common across all widgets
- Indicate the type of the widget
- De-activate a widget
- Order a widget in relation to other widgets
- Title and/or subtitle it
widget: "pages" active: false weight: 9 title: "Recent Publications" subtitle: ""Structure — Homapage — Widgets — Important Keys
Some keys are common across all widgets
- Indicate the type of the widget
- De-activate it
- Order it in relation to other widgets
- Title and/or subsitle it
Some keys are widget specific
- Link it to a content section
widget: "pages" active: false weight: 9 title: "Recent Publications" subtitle: "" page_type: "publication"Structure — Homapage — Widgets — Important Keys
Some keys are common across all widgets
- Indicate the type of the widget
- De-activate it
- Order it in relation to other widgets
- Title and/or subsitle it
Some keys are widget specific
- Link it to a content section
Widgets in the example site come with many keys and detailed definitions
- further documentation is available at https://sourcethemes.com/academic/docs/page-builder/
widget: "pages" active: false weight: 9 title: "Recent Publications" subtitle: "" page_type: "publication"Structure — Adding
There are at least three ways to add new pages and sections
- create new files and directories, respecting the directory structure of
HugoandAcademic - rename and edit the existing files and folders for your purposes
- duplicate, rename, and edit the existing files and folders that are in use
- create new files and directories, respecting the directory structure of
- RStudio has helpful buttons for these purposes
- to create, duplicate, and/or rename
- alternatively, use your operating system
Exercises — Structure — Adding
Rename one or more blogposts and publications on your website
- observe the changes in RStudio Viewer
Hint:
- this exercise is about structure, not the content
- JJD's website has the following
10:00
Structure — Removing
There are at least two ways to remove pages and sections
- delete them, respecting the directory structure of
HugoandAcademic- perhaps, you are sure there will not be two authors on your website
- the example site comes with two author profiles, under
/content/authors/ - with usernames
admin(main) and吳恩達(secondary) - it is safe to delete the latter
- the example site comes with two author profiles, under
- perhaps, you are sure there will not be two authors on your website
- turn them into drafts, by setting
- active: false in the YAML of widgets
- draft: true in the YAML of other Markdown files
- perhaps, you think you may need a section in the future
Exercises — Structure — Removing — Widgets
Keep only the widgets that you would like to have on your website
- set active: false in the front matter of the undesired widget
- re-order the desired widgets if necessary
- check if the homepage looks and works as expected
Hint:
/content/home/index.mdis not a widget- although it is under the same directory with all widgets
- although it is under the same directory with all widgets
- on JJD's website, the following widgets are active
- hero, about, experience, publications, posts, contact
- hero, about, experience, publications, posts, contact
- you may need to configure the menu in parallel
- by editing
/config/_default/menus.yaml
- by editing
10:00
Structure — Removing — Non-Widget Markdown
You can deactivate a specific page in a section
- add draft: true to file of that page
- e.g.,
/content/publication/journal-article/index.md
You can deactivate whole sections in one go
- add draft: true to file of that section
- e.g.,
/content/publication/_index.md
You can deactivate whole sections except one or more pages
- add draft: true to file of that section
- e.g.,
/content/publication/_index.md
- add draft: false to the file of a page
- e.g.,
/content/publication/journal-article/index.md
Structure — Removing — Non-Widget Markdown
Not all sections have
_index.mdto start with- e.g.,
/content/project/ - you can add one, following
- e.g.,
File -> New File -> R Script
Draft pages and sections are still visible to you in live preview
- e.i., when you use
blogdown::serve_site - but not to the visitors of your website
- e.i., if you publish your site
- e.i., when you use
Exercises — Structure — Non-Widget Markdown
Keep only the sections and pages that you would like to have on your website
- set the
draftkey totrueorfalsein the front matter of relevant files - check if the website looks and works as expected
- set the
Hint:
- on JJD's website, the following sections are active
- home, authors, post, publication
adminis the only author
- you may need to configure the menu in parallel
- by editing
/config/_default/menus.yaml
- by editing
- on JJD's website, the following sections are active
10:00
Deployment — Overview
Deployment of your website onto a web server makes it visible online
- your website is currently available on your computer only
You can deploy your website at any web server that you prefer
- Netlify is a popular choice as a web server
- easy to set up
- includes a free plan
- recommended by the authors of the
blogdownpackage and theAcademictheme
- Netlify is a popular choice as a web server
Deployment — Workflow
Deployment occurs in two steps
we push the website files, from our computer, into a GitHub repository
- for the first time, and after one or more edits
- with commands or clicks in RStudio
Netlify does the rest automatically, in a minute or so
- (re-)retrieves the files
- generates the website with
Hugo - (re-)publishes the website
Deployment — Git and GitHub — Definitions
- Git
- a software that keeps track of versions of a set of files
- it is local, the records are kept on your computer
Deployment — Git and GitHub — Definitions
- Git
- a software that keeps track of versions of a set of files
- it is local, the records are kept on your computer
- GitHub
- a hosting service, or a website, that can keep the records
- it is like Dropbox, but specifically structured to keep records with Git
- Repository, or repo
- a set of files whose records are kept together, by Git and/or on GitHub
- it is like a folder, which can keep files and other folders containing files
Deployment — Git and GitHub — Definitions
- To commit
- to take a snapshot of, to version a repository
- it is like saving a new version of all changed files in your folder with a new name
- it is local, the records are kept on your computer unless you
push
Deployment — Git and GitHub — Definitions
- To commit
- to take a snapshot of, to version a repository
- it is like saving a new version of all changed files in your folder with a new name
- it is local, the records are kept on your computer unless you
push
- To push
- to move the records from Git to GitHub, from your computer to online
- it is like uploading (the new versions of) your files to a website,
- it also involves merging, if this not the first push
- To pull
- to move the updated records from GitHub to your computer
- it is like downloading a zipped folder of files, and merging with the ones on your computer
Deployment — Git and GitHub — Workflow
Working with with Git and GitHub requires
- initial setup, done once*
- unless for a new computer or, if ever, a new GitHub account
- a bit technical, but worth the hassle
- project setup, repeated for every RStudio project
- shorter, less complicated
[*] We have started this process already, in Part 1 of the workshop, by downloading and installing Git and signing up for GitHub.
Deployment — Git and Github — Inital Setup
1) Enable version control with RStudio
- from the RStudio menu, follow:
Tools -> Global Options -> Git/SNV -> Enable version control interface for RStudio projects
RStudio will likely find Git automatically. In case it cannot, Git is likely to be at
c:/Program Files/Git/bin/git.exeon Windows/usr/local/git/bin/giton Mac
Deployment — Git and Github — Inital Setup
2) Set Git Bash as your shell (Windows-only step)
- from the RStudio menu, follow:
Tools -> Global Options -> Terminal -> New terminals open with: Git Bash
Deployment — Git and Github — Inital Setup
3) Introduce yourself to Git
- from the RStudio menu, follow:
Tools -> Terminal -> New Terminal
- enter the following lines in the Terminal
- replacing the relevant parts with your personal information
- e.g., the email address that you have used to sign up for GitHub
- replacing the relevant parts with your personal information
git config --global user.name "YOUR NAME" git config --global user.email "YOUR EMAIL ADDRESS"- enter the following line in the Terminal
- to observe whether the previous step was successful
git config --global --listDeployment — Git and Github — Project Setup
1) Initiate local version control with Git
- from the RStudio menu, follow:
Tools -> Version Control -> Project Setup... -> Version Control System -> Git
after confirming your new repository, and restarting the session, observe that
- now there is now a Git tab in RStudio,
- documenting the differences between you local repository and the one on GitHub
- when you change a file, it will appear here
- your project now includes a
.gitignorefile- this is where you can list files and/or folders to be excluded from being tracked
- now there is now a Git tab in RStudio,
Deployment — Git and Github — Project Setup
2) Create a new GitHub repository
- on GitHub, follow:
Repositories -> New -> Repository name (e.g., "my_website") -> Public -> Create repository
observe that
repository URLs have the following structure: https://github.com/USER_NAME/REPOSITORY_NAME
- this is the address to view the repository online
- for use in the
Terminal, the address gets the.gitextension
Version Control — Git and Github — Project Setup
3) Push an existing repository
- from the RStudio menu, follow:
Tools -> Terminal -> New Terminal
- enter the following lines in the
Terminal- with .yellow-h[your] username and repository name
git remote add origin https://github.com/USER_NAME/REPOSITORY_NAME.gitgit add .git commit -m "initial commit"git push -u origin master- Notice that
- your files are now online at your GitHub repository
- we have completed the first step in deployment
Deployment — Netlify — Setup
1) After logging in to Netlify, follow
New site from Git -> GitHub
- complete the authorisation process
- so that GitHub allows Netlify to access your repository
- once completed, pick your repository from the list, and click
Deploy site- the default settings should work
Deployment — Netlify — Setup
2) While on the Site overview page, click on Domain settings
- change the name of your site to something more meaningful
- by default, Netlify assigns a random name
- e.g., hus324n.netlify.app
- e.g., hus324n.netlify.app
- by default, Netlify assigns a random name
- if you have a custom domain name
- e.g., you have purchased yournamesurname.com
- click on
Add custom domainand follow the instructions
- if you don't have a custom domain name,
- click on
Optionsto change the random address to something more meaningful- e.g., yournamesurname.netlify.app
- click on
Deployment — Workflow — In Practice
1) In RStudio, edit your site with the its URL
- this is done through the
baseurlkey in/config.yaml - set it to
https://yournamesurname.netlify.app/- including the trailing slash
- observe whether the site still builds, in Viewer
2) Commit and Push
- under the Git tab in RStudio, find the file
- it will have
M, for modified, asStatus
- it will have
- tick
Staged* for that file, and clickCommit- enter a
Commit messagethat summarises the edit - click
Committo create a record of the new version locally to your computer - click
Close -> Pushto push the version to GitHub
- enter a
[*] To stage is to add files to be committed. It allows us to commit one or more files together or separately.
Deployment — Notes
- Avoid pushing your project to GitHub without checking it works locally first
- use
blogdownfor your advantage, observe it in Viewer
- use
Deployment — Notes
- Avoid pushing your project to GitHub without checking it works locally first
- use
blogdownfor your advantage, observe it in Viewer
- use
- If things still go wrong, you can revert back to the version on GitHub
git checkout HEAD PATH/TO/FOLDER/OR/FILEreverts a specific folder or filegit reset --hardreverts all
- Note that
- reverting as above gets rid of good as well as bad edits
- more nuanced approaches are possible
- reverting further back to one of the previous versions also possible
- see my workshop materials on working with with Git and GitHub for more information
- reverting as above gets rid of good as well as bad edits
Exercises — Deployment
Practice deployment one more time
- edit a piece of text that is visible on your website, and save
- e.g., the
titlekey in/config.yaml
- e.g., the
- observe the change locally, in Viewer
- stage, commit, push
- observe the change online, in a browser
- edit a piece of text that is visible on your website, and save
03:00
Content — Overview
Most of what is visible at website frontend is stored in three directories at the backend
- some files are under the
/assets/directory- most importantly, the website icon
- other display-as-is materials are under the
/static/directory- e.g., PDFs, images
- most materials are under the
/content/directory- e.g., Markdown files matching pages, widgets for the homapage
Content — /assets/
- This directory stores non-textual files to be processed
- by
Hugoto generate the website - e.g., images
- by
- By default, files under
/assets/do not have a matching URL- visitors will not be able to view them unprocessed on a browser
- Adding a file to
/assets/is straightforward- move or copy into it as normal
Academiclooks in/assets/media/for a website icon- it appears, e.g., on web browser tabs
- it must be named
icon.png - if not,
Academicuses the default icon
Exercises — Content — /assets/
Change your website icon
- by placing an image named
icon.pngto/assets/media/ - stage, commit, push
- observe the change online, in a browser
Hint:
- website icons are not visible in RStudio Viewer
- images are best saved as a square 512x512 pixel
- JJD's icon is the same as her profile picture
- available for download here
03:00
Content — /static/
- This directory stores non-textual files not to be processed
Hugosimply copies these files over to frontend- e.g., images
Content — /static/
- This directory stores non-textual files not to be processed
Hugosimply copies these files over to frontend- e.g., images
- By default, files under
/static/have a matching URL- visitors will be able to view them unprocessed on a browser
.└── /static/ | └── pfofile-photo.jpg # <- https://janejdoe.netlify.app/pfofile-photo.jpg | └── files/ | └── cv.pdf # <- https://janejdoe.netlify.app/files/cv.pdfContent — /static/
- This directory stores non-textual files not to be processed
Hugosimply copies these files over to frontend- e.g., images
- By default, files under
/static/have a matching URL- visitors will be able to view them unprocessed on a browser
- Adding a file to
/static/is straightforward- move or copy into it as normal
/static/is the right directory to store PDFs- e.g., cv, publications
Exercises — Content — /static/
Make one or more files available as-is on your website
- by placing them under
/static/- directly, or under a sub-directory
- stage, commit, push
- observe the change online, in a browser
Hint:
- static files are not visible in RStudio Viewer
- JJD's website has her cv and two publications available to view as-is
- download them from her website
05:00
Content — /content/
This directory stores mostly textual files to be processed
- mostly by
Hugo, some byblogdown - e.g., Markdown files
- mostly by
Most files under this directory are plain Markdown files
- with the
.mdextension - transformed by
Blackfriday—Hugo's Markdown rendering engine, so is Netlify's — into HTML- no need for
blogdown, but cannot execute any code
- no need for
- with the
Some are R Markdown files
- with either
.Rmdor.Rmarkdownextension- transformed by
pandoc—blogdown's rendering engine- therefore can execute code, thanks to
blogdown
- therefore can execute code, thanks to
- we will cover these in Part 8
- transformed by
- with either
Content — Markdown Syntax — Overview
Markdown is a plain-text file
- with its own syntax
- much easier to write than HTML
- the differences between plain and R Markdown syntaxes are minimal
- versatile, can be transformed into many different formats, including HTML
- with its own syntax
Content — Markdown Syntax — Overview
Markdown is a plain-text file
- with its own syntax
- much easier to write than HTML
- the differences between plain and R Markdown syntaxes are minimal
- versatile, can be transformed into many different formats, including HTML
- with its own syntax
Plain Markdown (
.md) followsBlackfriday's Markdown syntax- a useful guide to the basic MArkdown syntax is available at https://www.markdownguide.org/basic-syntax/
- a small number of
Blackfriday-specific extensions are available at https://github.com/russross/blackfriday
R Markdown (
.Rmdand.Rmarkdown) follows the syntax in Pandoc's Markdown- for the complete rules of the syntax, see Pandoc User's Guide
- for a useful summary of the syntax, see the R Markdown Cheat Sheet
Content — Markdown Syntax — Strategies
There are at least two different strategies to deal with
.mdversus.Rmddilemmause
.mdfor pages with no data,.Rmdfor pages with data- maximises the functionality from each
- requires learning the small differences if necessary
use
.Rmdfor all pages- requires learning only one syntax
- misses the additional functionality in
.md - folders get cluttered with intermediate files
The syntax in the following slides of this section will work with both types
- unless otherwise stated
- e.g., see tasks lists
- unless otherwise stated
Content — Markdown Syntax — Lines
Multiple spaces on a given line are reduced to one
This is a sentence followed by four spaces. This is another sentence on the same line.This is a sentence followed by four spaces. This is another sentence on the same line.
Line endings with fewer than two spaces are ignored
This is a sentence followed by one space.This is another sentence on a new line.This is a sentence followed by one space. This is another sentence on a new line.
Content — Markdown Syntax — Hard Brakes
Two or more spaces at the end of lines introduce hard brakes, forcing a new line
This is a sentence followed by two spaces. This is another sentence on a new line.This is a sentence followed by two spaces.
This is another sentence on a new line.
Content — Markdown Syntax — Block Quotes
Lines starting with the grater-than sign > introduce block quotes
> In God, we trust. All others must bring data. >> --- Anonymous In God, we trust. All others must bring data.
— Anonymous
Content — Markdown Syntax — Paragraphs
One or more* blank lines introduce a new paragraph
This is the first sentence of a paragraph as it is preceded by a blank line. This is the second sentence of that paragraph, which is followed by a blank line. This is the first sentence of a *new paragraph* as it is preceded by a blank line. This is the second sentence of that paragraph, which is followed by a blank line.This is the first sentence of a paragraph as it is preceded by a blank line. This is the second sentence of that paragraph, which is followed by a blank line.
This is the first sentence of a new paragraph as it is preceded by a blank line. This is the second sentence of that paragraph, which is followed by a blank line.
[*] Multiple blank lines between paragraphs reduced to one.
Content — Markdown Syntax — Comments
Text with the syntax <!--comments --> is omitted from output
<!-- This paragraph needs re-writing -->This is the first sentence of a paragraph as it is preceded by a blank line. This is the second sentence of that paragraph, which is followed by a blank line. This is the first sentence of a new paragraph <!-- I've removed italics --> as it is preceded by a blank line. This is the second sentence of that paragraph, which is followed by a blank line.This is the first sentence of a paragraph as it is preceded by a blank line. This is the second sentence of that paragraph, which is followed by a blank line.
This is the first sentence of a new paragraph as it is preceded by a blank line. This is the second sentence of that paragraph, which is followed by a blank line.
Content — Markdown Syntax — Headers
The number sign # introduces headers; lower levels are created with additional signs — up to total five levels
# Introduction becomes
Introduction
## 1. Introduction becomes
1. Introduction
### 3.1 Introduction becomes
3.1 Introduction
#### Introduction becomes
Introduction
##### Introduction becomes
Introduction
Content — Markdown Syntax — Emphases
A pair of single asterisk * or underscore _ introduces italics
*italics* becomes italics
_italics_ becomes italics as well
A pair of double asterisks or underscores introduces bold
**bold** becomes bold
__bold__ becomes bold as well
These two rules can be combined
**_bolditalics_** becomes boldsitalics
_**bolditalics**_ becomes bolditalics as well
Content — Markdown Syntax — Strikethrough
A pair of double tildes ~ introduces strikethrough
~~strikethrough~~ becomes strikethrough
Strikethrough can be combined with italics or bold
**~~strikebold~~** or __~~strikebold~~__, they both become strikebold
~~**strikebold**~~ or ~~__strikebold__~~, they both become strikebold as well
*~~strikeitalitcs~~* or _~~strikeitalitcs~~_, they both become strikeitalitcs
~~*strikeitalitcs*~~ or ~~_strikeitalitcs_~~, they both become strikeitalitcs as well
Content — Markdown Syntax — Links — Internal*
You can link text to section headers in the same document
[Conclusion](#conclusion) becomes Conclusion, and a click takes the screen to that section
Multi-word headers need hyphenation
[Literature Review](#literature-review) becomes Literature Review, and it works only if the second part is hyphenated
[*] We will cover links to references, figures, and tables later on.
Content — Markdown Syntax — Links — External
You can link text to URLs
[click here](https://janejdoe.netlify.app/) becomes click here
<https://janejdoe.netlify.app> becomes https://janejdoe.netlify.app
[https://janejdoe.netlify.app](https://janejdoe.netlify.app/) becomes
https://janejdoe.netlify.app as well
You can also link text to email addresses
[email me](mailto:j.j.doe@kriens.edu)* becomes email me
<j.j.doe@kriens.edu> becomes j.j.doe@kriens.edu
[*] Notice the prefix mailto: in the second part of the construct
Content — Markdown Syntax — Footnotes
Use the [^identifier] syntax, with identifiers defined elsewhere in the same document, to create a footnote
Dr Doe holds a PhD in rock science.[^1][^1]: She defended her thesis in 2017.Dr Doe holds a PhD in rock science.1
[1] She defended her thesis in 2017.
Content — Markdown Syntax — Lists
Lines starting with asterisk * as well as plus + or minus − signs introduce lists
- books- articles- reports- books
- articles
- reports
Content — Markdown Syntax — Lists — Nesting
Lists can be nested within each other, with indentation
+ books+ articles - published - under review + revised and resubmitted - work in progress- books
- articles
- published
- under review
- revised and resubmitted
- work in progress
Content — Markdown Syntax — Lists — Numbering
List items can be numbered
1. books2. articles - published - under review + revised and resubmitted - work in progress- books
- articles
- published
- under review
- revised and resubmitted
- work in progress
Content — Markdown Syntax — Lists — Numbering
List items can be numbered
1. books2. articles - published - under review + revised and resubmitted - work in progress- books
- articles
- published
- under review
- revised and resubmitted
- work in progress
Content — Markdown Syntax — Lists — Tasks Lists
Task lists can be created in plain Markdown, but not in R Markdown
- [x] books- [ ] articles - [ ] published - [x] under review + [x] revised and resubmitted - [ ] work in progressContent — Markdown Syntax — Dashes
Two hyphens grouped together introduce an en-dash
‐‐ becomes –
Three hyphens grouped together introduce an em-dash
‐‐‐ becomes —
Content — Markdown Syntax — Highlithing
Highlight any piece of text, by putting it in between a pair of backticks `
`code` becomes code
Content — Markdown Syntax — Highlithing
Highlight any piece of text, by putting it in between a pair of backticks `
`code` becomes code
Highlight blocks of text by putting them in between two lines, each starting with three backticks ```
```df <- mtcars %>% filter(gear > 3)```becomes
df <- mtcars %>% filter(gear > 3)Content — Markdown Syntax — Tables
The following syntax introduces hand-made tables
|First Column | Second Column | |------------ | ------------- ||First cell | First cell | |Second cell | Second cell ||Third cell | Third cell || First Column | Second Column |
|---|---|
| First cell | First cell |
| Second cell | Second cell |
| Third cell | Third cell |
Content — Markdown Syntax — Tables
The following syntax introduces hand-made tables
|First Column | Second Column | |------------ | ------------- ||First cell | First cell | |Second cell | Second cell ||Third cell | Third cell || First Column | Second Column |
|---|---|
| First cell | First cell |
| Second cell | Second cell |
| Third cell | Third cell |
Note that
- R Markdown makes it possible to customise hand-made tables futher
- we will cover these in Part 8
Content — Markdown Syntax — Images
The syntax  embeds images into HTML outputs
- similar to the link syntax, only this time it is preceded by an exclamation mark !
- goes a new line, separate from the text
- assumes the figure is in the same folder with the Markdown file*
[*] If the image is in static/, use a path relative to that directory, e.g., 
Content — Images — Markdown Syntax

Content — Images — Notes
- Images can also be added through YAML
- e.g., to blogposts, publications
- using the
imagekey
- These images must be saved in the same directory
- as
featured.jpg - rename or remove it if having them is not desireble
- removing the
imagekey in YAML is not effective
- removing the
- as
Exercises — Content
Edit one or more Markdown files in your website project
- observe the change locally, in Viewer
- stage, commit, push
- observe the change online, in a browser
Hint, if you are re-creating JJD's website:
add and/or edit one or more of the following files
/content/home/hero.md, matching this widget/content/author/admin/index.md, matching this widget/content/blog/academic-websites/index.md, matching this post
by copy the text from the website to save time
- paste into Markdown, and add the syntax
30:00
R Markdown — Overview
- R Markdown is a special type of Markdown
- can run code, and embed the results from data into HTML
- have the
.Rmdor.Rmarkdownextension
R Markdown — Overview
- R Markdown is a special type of Markdown
- can run code, and embed the results from data into HTML
- have the
.Rmdor.Rmarkdownextension
Hugocannot transform R Markdown into HTML- that is why we need the
blogdownpackage - transformation of these files takes places locally on your computer
- not remotely at the server — e.g., Netlify
- that is why we need the
- R Markdown is very similar to Markdown in terms of syntax
- except that it includes code
- mostly R code, but could also be python
- except that it includes code
R Markdown — Code — Overview
Most codes go inside code chunks
- e.g., code that imports and cleans data, and/or produces tables and/or figures
```{r}df <- mtcars %>% mutate(disp_litre = disp / 61.0237)```Codes can also go in line with text
- .e.g., code that result in a single statistic
The average engine displacement of the cars in the dataset is `r mean(df$disp_litre)` litres.R Markdown — Code Chunks — Overview
- Code chunks are delimited spaces between a pair of three backticks
- below is an empty chunk for R code
```{r}```R Markdown — Code Chunks — Overview
- Code chunks are delimited spaces between a pair of three backticks
- below is an empty chunk for R code
```{r}```ris an option of the chunk, indicating that the code in the chunk above should be run by R- it could have been
python, which we will not cover in this workshop - options go in a pair of curly brackets, on the same line with the first delimiter
- it could have been
R Markdown — Code Chunks — Overview
- Code chunks are delimited spaces between a pair of three backticks
- below is an empty chunk for R code
```{r}```ris an option of the chunk, indicating that the code in the chunk above should be run by R- it could have been
python, which we will not cover in this workshop - options go in a pair of curly brackets, on the same line with the first delimiter
- it could have been
- Chunks can be placed anywhere in .Rmd documents
- their output will be placed instead of, or following,* the code chunk on the website page
[*] Depending on whether code chunks are displayed or not. See the echo option in the following slides.
R Markdown — Code Chunks — Labels
Label the code chunks right after r
```{r, tidydata}df <- mtcars %>% mutate(disp_litre = disp / 61.0237)```R Markdown — Code Chunks — Labels
Label the code chunks right after r
```{r, tidydata}df <- mtcars %>% mutate(disp_litre = disp / 61.0237)```Note that
- labels are optional, but recommended because they
- can be used in text, to refer to tables or figures that code chunks produce
- can help with navigating through error messages
- duplicate labels lead to an error
R Markdown — Code Chunks — Options
Code chunks take options, listed on the same line with the first delimiter, in curly brackets
- avoid spaces around the equal sign = between option tags and values
- such spaces might lead to errors
- such spaces might lead to errors
- in the example below, the chunk is labelled as
setup, and and theincludeoption is set toFALSE- with this option and value, nothing from this chunk will be included in the output document
- avoid spaces around the equal sign = between option tags and values
```{r, tidydata, include=FALSE}```The list of options is available at https://yihui.org/knitr/options
- R Markdown Cheat Sheet provides a helpful list as well
R Markdown — Code Chunks — Options — Defaults
Options have default values
- e.g., for
echo, the default isTRUEecho: should the source code printed in the output? — yes
- therefore the following two chunks have the same function
```{r, tidydata}``````{r, tidydata, echo=TRUE}```R Markdown — Code Chunks — Options — Defaults
This chunk prints two things in the output document — (a) the code and (b) the head of the data frame
```{r, headdata}head(df)```head(df)
## mpg cyl disp hp drat wt qsec vs am gear carb disp_litre## Mazda RX4 21.0 6 160 110 3.90 2.620 16.46 0 1 4 4 2.621932## Mazda RX4 Wag 21.0 6 160 110 3.90 2.875 17.02 0 1 4 4 2.621932## Datsun 710 22.8 4 108 93 3.85 2.320 18.61 1 1 4 1 1.769804## Hornet 4 Drive 21.4 6 258 110 3.08 3.215 19.44 1 0 3 1 4.227866## Hornet Sportabout 18.7 8 360 175 3.15 3.440 17.02 0 0 3 2 5.899347## Valiant 18.1 6 225 105 2.76 3.460 20.22 1 0 3 1 3.687092R Markdown — Code Chunks — Options
Setting echo=FALSE prevents the code from being displayed in the output document
```{r, headdata, echo=FALSE}head(df)```This chunk therefore prints one thing in the output document — the head of the data frame
## mpg cyl disp hp drat wt qsec vs am gear carb disp_litre## Mazda RX4 21.0 6 160 110 3.90 2.620 16.46 0 1 4 4 2.621932## Mazda RX4 Wag 21.0 6 160 110 3.90 2.875 17.02 0 1 4 4 2.621932## Datsun 710 22.8 4 108 93 3.85 2.320 18.61 1 1 4 1 1.769804## Hornet 4 Drive 21.4 6 258 110 3.08 3.215 19.44 1 0 3 1 4.227866## Hornet Sportabout 18.7 8 360 175 3.15 3.440 17.02 0 0 3 2 5.899347## Valiant 18.1 6 225 105 2.76 3.460 20.22 1 0 3 1 3.687092R Markdown — Code Chunks — Other Useful Options
Prevent the result(s) of the source code from being displayed in the output document
```{r, headdata, results="hide"}head(df)```This chunk therefore prints one thing in the output document — the source code
head(df)
R Markdown — Code Chunks — Other Useful Options
Cache results for future compilations
```{r ... cache=TRUE}```R Markdown — Code Chunks — Other Useful Options
Cache results for future compilations
```{r ... cache=TRUE}```Prevent R from running the code in the chunk altogether
```{r ... eval=FALSE}```R Markdown — Code Chunks — Other Useful Options
Cache results for future compilations
```{r ... cache=TRUE}```Prevent R from running the code in the chunk altogether
```{r ... eval=FALSE}```Prevent messages and/or warnings from being displayed in the output
```{r ... error=FALSE, message=FALSE, warning=FALSE}```R Markdown — Code Chunks — Other Useful Options
Define the actual dimensions of figures, in inches
```{r ... fig.height=6, fig.width=9}```R Markdown — Code Chunks — Other Useful Options
Define the actual dimensions of figures, in inches
```{r ... fig.height=6, fig.width=9}```Define the size of figures in the output document, with out.width and/or out.height
```{r ... out.width="50%"}```R Markdown — Code Chunks — Other Useful Options
Define the actual dimensions of figures, in inches
```{r ... fig.height=6, fig.width=9}```Define the size of figures in the output document, with out.width and/or out.height
```{r ... out.width="50%"}```Define the alignment of figures — left, right, or center
```{r ... fig.align="center"}```R Markdown — Code Chunks — Other Useful Options
Define captions for figures
```{r ... fig.caption="A Scatter Plot"}```R Markdown — Code Chunks — Other Useful Options
Define captions for figures
```{r ... fig.caption="A Scatter Plot"}```Set the resolution for figures
```{r ... dpi=300}```R Markdown — Code Chunks — Other Useful Options
Define captions for figures
```{r ... fig.caption="A Scatter Plot"}```Set the resolution for figures
```{r ... dpi=300}```Set extra options, which rmarkdown will write into the <img /> tag
```{r ... out.extra='style="display:block;"'}```R Markdown — Code Chunks — The Setup Chunk
It is recommended to use the first code chunk for general setup, where you can
- define your own defaults for chunk options, with
knitr::opts_chunk$set()- avoids repeating chunk options
- avoids repeating chunk options
- load the necessary packages
- import raw data
```{r, setup, include=FALSE}# chunk option defaultsknitr::opts_chunk$set(echo=FALSE, message=FALSE)# packageslibrary(dplyr)library(ggplot2)library(knitr)# datadf_raw <- mtcars```R Markdown — Code Chunks — The Setup Chunk — Data
Note that the data source can be anywhere that R can access
```{r, setup, include=FALSE}...# this dataset is available onlinedf_online <- read.csv("http://www.parlgov.org/static/data/development-cp1252/view_party.csv")# this dataset is in the same directory as my .Rmd filedf_local <- read.csv("view_cabinet.csv")```R Markdown — Code Chunks — The Data Chunk
I recommend using the second chunk for the main operations* on raw data
- e.g., for data cleaning and other transformations
- some minor transformations could be left to lower chunks
- e.g., capitalizing variable names for figures
```{r, data, echo=FALSE ...}df <- df_raw %>% mutate(disp_litre = disp / 61.0237)```R Markdown — Inline Code — Overview
Code can also be incorporated in text, with the `r ` syntax
- unlike chunks, these do not take options
- the output document will display the result of the code
- in the exact place of the source code
- in the exact place of the source code
- the result of the code will have the same formatting with the text
R Markdown — Inline Code — Examples
If we multiply _pi_ by 5, we get `r pi * 5`.If we multiply pi by 5, we get 15.7079633.
The average the engine displacement of the cars in the dataset is `r mean(df$disp_litre)` litres, which would round to `r round(mean(df$disp_litre), digits = 1)`.The average the engine displacement of the cars in the dataset is 3.7808569, which would round to 3.8.
__Only `r nrow(subset(df, gear == 5))` cars__ in the dataset have five forward gears.Only 5 cars in the dataset have five forward gears.
R Markdown — Figures
Place code that produces figures in code chunks
```{r, scatterplot, fig.cap = "A scatterplot of cars.", echo=FALSE}ggplot(data = df, mapping = aes(x = wt, y = mpg, color = cyl)) + geom_point() + scale_colour_gradient(name = "Cylinders", high = "#132B43", low = "#56B1F7", breaks = c(4, 6, 8)) + labs(x = "Weight", y = "Miles/Gallon") + theme_bw()```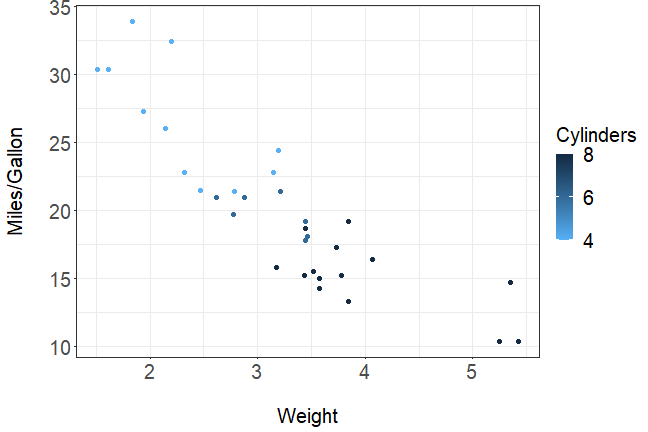
Figure 1. A scatterplot of cars.
R Markdown — Figures — Cross-References
Use the following syntax to refer to figures
See Figure \@ref(fig:scatterplot) below.```{r, scatterplot, fig.cap = "A scatterplot of cars.", echo=FALSE}ggplot(data = df, mapping = aes(x = wt, y = mpg, color = cyl)) + geom_point() + scale_colour_gradient(name = "Cylinders", high = "#132B43", low = "#56B1F7", breaks = c(4, 6, 8)) + labs(x = "Weight", y = "Miles/Gallon") + theme_bw()```
R Markdown — Tables —
Place code that produces HTML tables in code chunks
```{r, headdata, echo=FALSE}kable(head(df, 3), caption = "First three rows in the dataset")```| mpg | cyl | disp | hp | drat | wt | qsec | vs | am | gear | carb | disp_litre | |
|---|---|---|---|---|---|---|---|---|---|---|---|---|
| Mazda RX4 | 21.0 | 6 | 160 | 110 | 3.90 | 2.620 | 16.46 | 0 | 1 | 4 | 4 | 2.621932 |
| Mazda RX4 Wag | 21.0 | 6 | 160 | 110 | 3.90 | 2.875 | 17.02 | 0 | 1 | 4 | 4 | 2.621932 |
| Datsun 710 | 22.8 | 4 | 108 | 93 | 3.85 | 2.320 | 18.61 | 1 | 1 | 4 | 1 | 1.769804 |
Table 1. First three rows in the dataset.
R Markdown — Tables — Cross-References
Use the following syntax to refer to tables
See Table \@ref(tab:headdata) below.```{r, headdata, echo=FALSE}kable(head(df, 3), caption = "First three rows in the dataset")```See Table 1 below.
| mpg | cyl | disp | hp | drat | wt | qsec | vs | am | gear | carb | disp_litre | |
|---|---|---|---|---|---|---|---|---|---|---|---|---|
| Mazda RX4 | 21.0 | 6 | 160 | 110 | 3.90 | 2.620 | 16.46 | 0 | 1 | 4 | 4 | 2.621932 |
| Mazda RX4 Wag | 21.0 | 6 | 160 | 110 | 3.90 | 2.875 | 17.02 | 0 | 1 | 4 | 4 | 2.621932 |
| Datsun 710 | 22.8 | 4 | 108 | 93 | 3.85 | 2.320 | 18.61 | 1 | 1 | 4 | 1 | 1.769804 |
Table 1. First three rows in the dataset.
R Markdown — Tables — Hand-Made
The following syntax, outside code chunks, introduces tables*
First Column Second Column ------------ ------------- First cell First cell Second cell Second cell Third cell Third cell| First Column | Second Column |
|---|---|
| First cell | First cell |
| Second cell | Second cell |
| Third cell | Third cell |
* The table syntax on this and following seven slides will work in R Markdown files only — they will not work in plain Markdown.
R Markdown — Tables — Hand-Made
The position of headers, relative to their line underneath, defines column alignments
Left-Aligned Centered ---------------- ----------------First cell First cell Second cell Second cell Third cell Third cell| Left-Aligned | Centered |
|---|---|
| First cell | First cell |
| Second cell | Second cell |
| Third cell | Third cell |
R Markdown — Tables — Hand-Made
A line starting with a colon, placed before or after tables, introduces captions
Centered Right-Aligned ---------------- ----------------First cell First cell Second cell Second cell Third cell Third cell : A hand-made table with R Markdown| Centered | Right-Aligned |
|---|---|
| First cell | First cell |
| Second cell | Second cell |
| Third cell | Third cell |
R Markdown — Tables — Hand-Made
The caption line itself needs to be surrounded by empty lines
Centered Right-Aligned ---------------- ----------------First cell First cell Second cell Second cell Third cell Third cell : A hand-made table with R Markdown | Centered | Right-Aligned |
|---|---|
| First cell | First cell |
| Second cell | Second cell |
| Third cell | Third cell |
R Markdown — Tables — Hand-Made
Tables are numbered automatically
: A hand-made table with R Markdown Centered Right-Aligned ---------------- ----------------First cell First cell Second cell Second cell Third cell Third cell| Centered | Right-Aligned |
|---|---|
| First cell | First cell |
| Second cell | Second cell |
| Third cell | Third cell |
R Markdown — Tables — Hand-Made
Grid tables, with the following syntax, can handle complex cells with multiple lines and/or lists
+--------------------+--------------------+| First Column | Second Column | +====================+====================+| - First item | First cell | | - Second item | | | - Third item | |+--------------------+--------------------+|Second cell | Second cell with a | | | long text | +--------------------+--------------------+| Third cell | Third cell | | | | +--------------------+--------------------+: A grid table with multi-line cells| First Column | Second Column |
|---|---|
| - First item - Second item - Third item |
First cell |
| Second cell | Second cell with a long text |
| Third cell | Third cell |
R Markdown — Tables — Hand-Made
Grid tables can be aligned as well, with colons at the boundaries of the header separator*
+--------------------+--------------------+| Left-Aligned | Centered | +:===================+:==================:+| - First item | First cell | | - Second item | | | - Third item | |+--------------------+--------------------+|Second cell | Second cell with a | | | long text | +--------------------+--------------------+| Third cell | Third cell | | | | +--------------------+--------------------+: A grid table with multi-line cells| Left-Aligned | Centered |
|---|---|
| - First item - Second item - Third item |
First cell |
| Second cell | Second cell with a long text |
| Third cell | Third cell |
* Use := for left-aligned, :=: for centered, =: for right-aligned columns.
R Markdown — Tables — Hand-Made — Cross-References
Use the following syntax to refer to hand-made tables
See Table \@ref(tab:handmade) below. Centered Right-Aligned ---------------- ----------------First cell First cell Second cell Second cell Third cell Third cell : (\#tab:handmade) A hand-made table with R MarkdownSee Table 1 below.
| Centered | Right-Aligned |
|---|---|
| First cell | First cell |
| Second cell | Second cell |
| Third cell | Third cell |
Exercises — R Markdown
Add and/or edit one or more R Markdown files in your website project
- observe the change locally, in Viewer
- stage, commit, push
- observe the change online, in a browser
Hint, if you are re-creating JJD's website:
add and edit the following file
/content/post/cabinet-size/index.Rmd, matching this blogpost
by copy the text from the website to save time
- paste into R Markdown, and add the code and syntax
30:00
References
Dowle, M. and Srinivasan, A. (2021). data.table: Extension of 'data.frame'. R package, version 1.14.0.
Sievert, C., Parmer, C., Hocking, T., Chamberlain, S., Ram, K., Corvellec, M., & Despouy, P. (2021). plotly: Create Interactive Web Graphics via 'plotly.js'. R package, version 4.9.3.
Wickham, H. and Grolemund, G. (2019). R for data science. O'Reilly. Open access at https://r4ds.had.co.nz.
Wickham, H., Chang, W., Henry, L., Pedersen, T. L., Takahashi, K., Wilke, C., Woo, K., Yutani, H. and Dunnington, D. (2021). dplyr: A grammar of data manipulation. R package, version 1.0.5.
Wickham, H., François, W., Henry L. and Müller, K. (2020). ggplot2: Create elegant data visualisations using the grammar of graphics. R package, version 3.3.3.
Xie, Y. (2021). knitr: A general-purpose package for dynamic report generation in R. R package, version 1.33.
Xie, Y., Dervieux, C., and Hill, A. P. (2021a). blogdown: Create blogs and websites with R Markdown. R package, version 1.3.
Xie, Y., Thomas, A., and Hill, A. P. (2021b). blogdown: Creating Websites with R Markdown. Open access at https://bookdown.org/yihui/blogdown.